

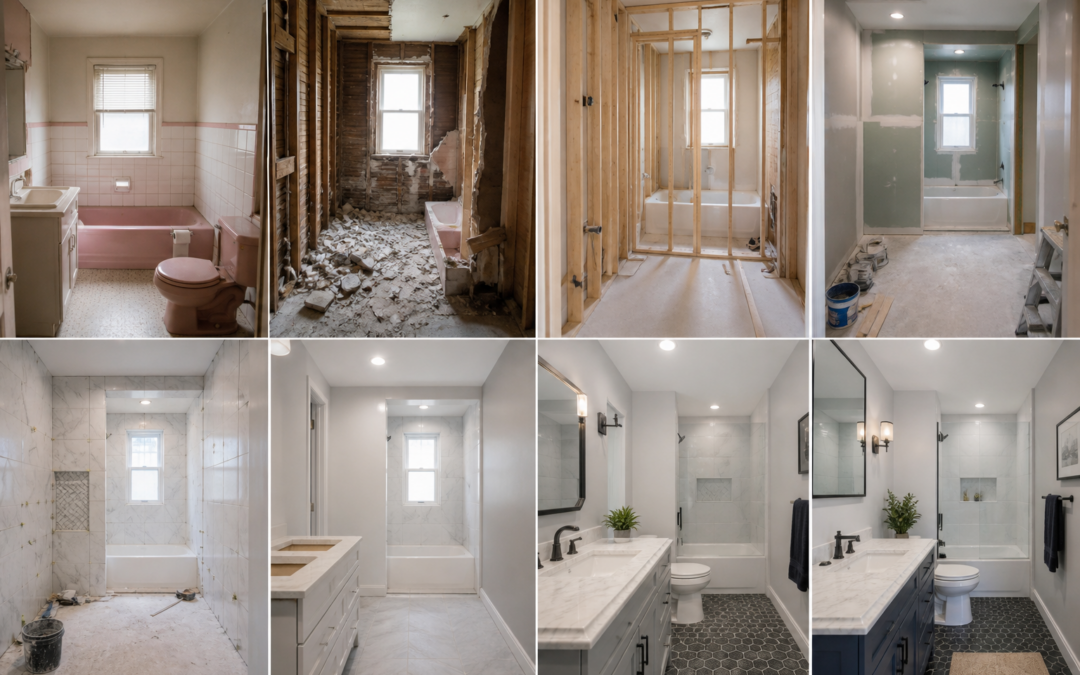
Bathroom renovation timeline explained can bring peace of mind to homeowners who are eager to transform an outdated space into something beautiful, functional, and deeply personal. From the first design decisions to demolition, plumbing, tile work, and the final finishing touches, knowing what each phase involves helps set realistic expectations and reduces stress along the way.
A well-planned renovation is about more than construction—it is about creating a bathroom that supports your daily routine, reflects your style, and adds lasting comfort to your home.
A clear bathroom remodel schedule gives every homeowner something invaluable: confidence. When you understand how a bathroom renovation moves from one phase to the next, it becomes easier to plan your life, protect your budget, and feel excited about the progress happening inside your home.
For many families, a bathroom is one of the most used rooms in the house, which is why timing matters so much. A realistic bathroom renovation timeline helps reduce surprises and allows each step to be completed with care.
WHY A BATHROOM RENOVATION TIMELINE MATTERS
A detailed bathroom renovation timeline is about more than dates on a calendar. It helps coordinate materials, labor, inspections, and craftsmanship so your remodel stays organized.
Whether you are updating a guest bath or completely reworking a primary suite, knowing the expected bathroom remodel timeline can help you make practical choices early.
A strong timeline supports:
– Better budgeting
– More accurate scheduling
– Faster decision-making
– Less disruption to daily life
– Improved communication with your builder
When a remodeling project is thoughtfully managed, each stage builds toward a finished space that feels intentional and refined rather than rushed.
PHASE 1: CONSULTATION AND PROJECT PLANNING
Every successful renovation begins with a conversation. During the early planning phase, homeowners share goals, style preferences, functional needs, and budget expectations.
This is the moment where a builder learns what is not working in the current layout and what changes will make the greatest difference.
At this point, your team may discuss:
– Storage needs
– Lighting improvements
– Shower or bathtub upgrades
– Accessibility features
– Flooring and tile preferences
– Plumbing fixture placement
This step can take anywhere from several days to a few weeks depending on the complexity of the remodel. A larger vision or custom design may require more planning time, but this investment often leads to a smoother renovation process overall.
PHASE 2: DESIGN DEVELOPMENT AND MATERIAL SELECTIONS
One of the most exciting parts of a bathroom renovation is shaping the visual identity of the space. During design development, selections are made for cabinetry, tile, countertops, fixtures, paint colors, mirrors, hardware, and lighting.
This part of the bathroom renovation timeline explained in detail is often the foundation for everything that follows.
Material lead times can affect the overall bathroom remodel schedule. Custom vanities, specialty tile, premium fixtures, or made-to-order glass often take longer to arrive.
Ordering these items early helps avoid delays later.
This is also when layouts are finalized. If walls are moving, plumbing is shifting, or electrical updates are needed, those details must be clearly documented before construction begins.
PHASE 3: PERMITS AND PRE-CONSTRUCTION PREPARATION
Depending on the scope of work, permits may be needed before demolition starts. Plumbing, electrical, and structural changes often require approvals and inspections.
While some homeowners view this as a delay, permits are a critical part of protecting safety and code compliance.
The pre-construction stage may also include:
– Site measurements
– Final scope review
– Product delivery coordination
– Jobsite protection planning
– Temporary bathroom arrangements
For homeowners wondering how long a bathroom renovation takes, this phase is important because it establishes the structure that supports the project. A bathroom renovation timeline explained properly always includes administrative and logistical preparation, not just visible construction work.
PHASE 4: DEMOLITION
Demolition is where the transformation becomes real. Old tile is removed, outdated vanities come out, tubs or showers are taken apart, and the room is cleared down to the framework as needed.
This stage is often quick, but it can reveal hidden issues behind walls or under floors.
Some common discoveries include:
– Water damage
– Mold
– Improper past repairs
– Outdated plumbing
– Electrical concerns
When these issues are found, the bathroom remodel timeline may shift slightly to allow proper repairs. While unexpected, correcting underlying problems is essential for building a bathroom that lasts.
PHASE 5: ROUGH PLUMBING, ELECTRICAL, AND FRAMING
Once the space is opened up, essential systems are updated. Rough plumbing and electrical work happen behind the walls before finishes are installed.
If the new design includes relocating a shower, adding double sinks, installing a heated floor, or improving ventilation, this is when those features are built into the structure of the room.
Framing adjustments may also be completed if walls are being reconfigured or niches, support elements, and custom features are being added.
Inspections may occur during this stage depending on local requirements. These checkpoints help ensure work is being performed correctly and safely.
PHASE 6: DRYWALL, WATERPROOFING, AND SURFACE PREP
With the infrastructure in place, walls can be closed and surfaces prepared for finishing. Drywall installation and patching are followed by waterproofing in moisture-prone areas, especially around showers and tubs.
This phase is one of the most important parts of any bathroom remodeling timeline because it protects the long-term durability of the room.
Preparation also includes:
– Subfloor leveling
– Backer board installation
– Shower pan preparation
– Corner and seam treatment
– Surface smoothing for paint or tile
A beautiful bathroom is only as strong as the work beneath the surface. Taking time here helps prevent future damage and supports a more polished final result.
PHASE 7: TILE AND FLOORING INSTALLATION
Tile work often defines the visual character of a bathroom. It can add calm, luxury, texture, warmth, or bold personality depending on the design.
During this stage, flooring, shower walls, backsplashes, and accent details are installed with careful attention to alignment and finish quality.
Because tile requires precision, this phase can take longer than some homeowners expect. Layout planning, cutting, setting, grouting, and curing all require time.
If the design includes intricate patterns, large-format tile, or detailed stone work, the bathroom renovation timeline may expand to allow for proper craftsmanship.
PHASE 8: CABINETRY, COUNTERTOPS, AND FIXTURES
As construction progresses, the room begins to feel functional again. Vanities are installed, countertops are fitted, sinks are connected, and plumbing fixtures are placed.
Lighting, mirrors, faucets, shower trim, towel bars, and accessories complete the look.
This stage is often rewarding because it turns the project from a construction zone into a space that finally feels like part of your home again.
**[Click Here to Get Started](https://ironwoodsignaturebuilders.com)**